Forearm stands are super intimidating things. They really are. I'll guarantee that 99% of you looking at this post THINK you can't do them. Couldn't do them in a million years. Well you're wrong. For me personally - they're easier than handstands... and anyone can do a handstand.
I post pics of forearm stands (aka Pincha Mayurasana) every now and then. They're on my flickr, they're on my blog, they're on my bodyspace, they're just everywhere. I love them and I do them everyday. I used to think that I'd never be able to do them. Look at me now. Doesn't my doubtful past self feel sheepish? People sometimes ask me how to do them. So I teach them. I've been teaching forearm stands and getting people into their FIRST forearm stand since before I could do them myself. Today I'm going to break it down for you. Soak it in, practice it, and experience the revelation that is a forearm stand.
I
always warm up with sun salutations before I do forearm stands.. I do this because I need the sun salutations to open my hips, hamstrings, and shoulders. I need them to wake up my feet, fingers, and core. Make sure that you're warmed up before you do any of these poses. If you don't - you may hurt yourself and that will suck.
 |
| Start in Downdog. Press your chest toward your feet to open your shoulders a little more. |
 |
From downdog, keep your feet and hands in place, but lower your forearms onto the floor. Make sure your forearm makes a straight line behind your wrist to your elbow parallel to the sides of your mat. Raise your hips up - just like downdog. Claw your fingers into the floor and walk your feet in towards your hands - as close as you can take it. Hold here and breathe.
If this is as far as you can go for a while - just practice this. |
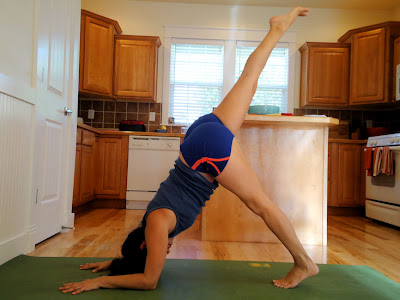 |
Once you can hold the previous pose for a bit - take one leg straight up. Think of making a straight line from elbows to toes. This will prepare you for kicking up later. Also - it brings more weight into your upper body. Lower the leg after a few breaths and switch sides. If you need it - take childs pose in between sides to give your shoulders a rest.
Get comfortable with these poses before you start practicing at the wall. |
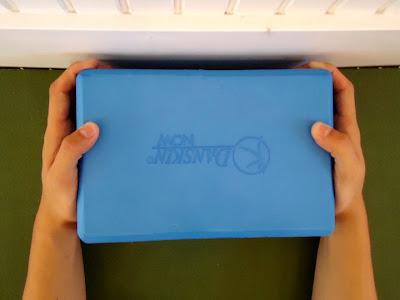 |
| Once you're ready to start kicking up - grab a block and move to the wall. This is how you'll hold it. You want your fingers right up against the wall but don't smash them. |
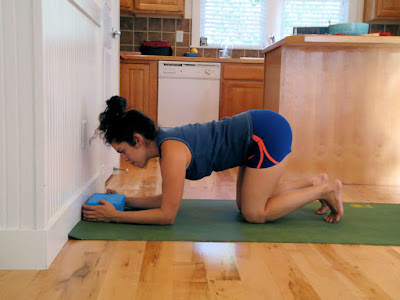 |
| Set up just like before... forearms on the floor and parallel - lengthen your side body. Melt your heart down while you puff up the back of your kidneys a bit. Press into that forearm version of downdog - while holding the block as shown above. Press your wrists into the floor and draw your elbows energetically towards each other. They should feel active, but not move. |
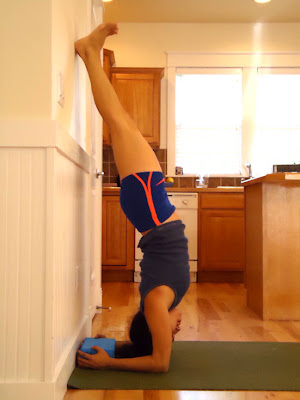 |
Remember the one leg up? Do that... then lightly bend your bottom knee and "hop" up. Keep it soft. Don't throw yourself around like you don't matter. Bring your heels to the wall and draw your legs together. Press your heels UP toward the ceiling - HARD. Press your wrists/forearms into the floor as if pushing the floor away from you. Tuck your tailbone away from the wall and look straight ahead, not down. Hold, Breathe.
Come down after a few breaths and kick up with the other leg. |
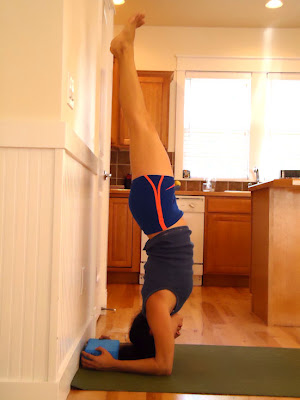 |
| Once you get up - remember you're balancing over your shoulders not your hands. Eventually you'll find the sweet spot and your feet will kinda find their own way off of the wall. (this might happen over months of practice) Keep your feet active, legs together, and tailbone super tucked. |
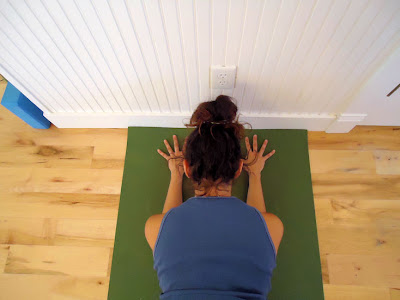 |
Eventually you'll be ready to ditch the block. You'll know you're ready when you try it without the block and your hands don't drag themselves together when you press up into downdog/forearm stand.
Without the block - this is what setup looks like. Fingertips are maybe an inch away from the wall, palms flat like downdog. You want your hands shoulder distance apart - mine might be a little too close here. Otherwise everything else is exactly the same as before. |
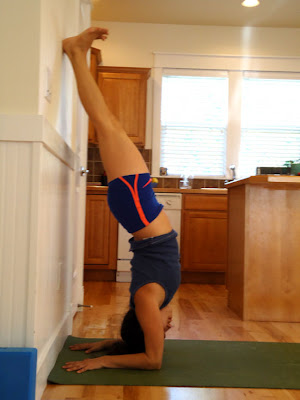 |
| Without the block you have to claw your fingers into the floor instead of the block. |
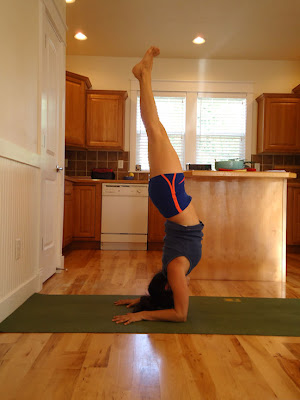 |
| Once you're comfortable at the wall for a while you can gradually start adding distance between you and the wall until you're just out in the middle of the room. You'll probably fall all the way over a million times if you don't use a spotter. Grab a friend if you're not a good faller. I still fall all the time. In this pic I need to tuck my tailbone more and puff my kidneys a bit more to get my feet more above my shoulders a bit. Just so you know. |
After working on your forearm stands spend some time in child's pose to relax and quiet your mind. Forearm stands always gets me pumped up, so I have to calm that energy down a bit. Also - a little tip I practice and tell my students to do: End on a high note. If you're practicing and you get your best one to date... or you just felt really stable... or whatever... if you're psyched... call it a day. Better that than quitting frustrated because you got a great one and now all the rest suck.
Now that you know all about how to do it. Practice Practice Practice. Practice in your kitchen, practice in your garage, practice at the gym, practice on the playground, practice against a tree, and practice with a Friend!
In general, this sequence is for anyone, but please don't try this sequence without speaking to your Dr. first if you have any medical/physical problems. Seek Peace At Your Own Risk!
You May Also Enjoy:


