Showing posts with label sequence. Show all posts

Friday, December 21, 2012

Yoga Video for the Winter Blues

Today is the Winter Solstice (some people think it's also the end of the world but let's focus on the more likely instance of winter).

I live in Idaho these days. In a pretty upbeat part, but still kind of northward as far as weather is concerned. Living up north can suck. I don't like wind, cold, or grey skies... and snow gets old real fast. The suckitude of winter can take an especially dark turn for those prone to seasonal depression.

Whether you suffer from S.A.D. or only get a little lacking in motivation for the darker months - you can benefit from today's sequence made specifically for Winter Blues. I guess if you're concerned about the end of the world - this might be for you too. At only 34 minutes long it won't be hard to squeeze it in.

Good for beginners. Do this as often as you feel like.


Readers via Email - Click Here for the Video.

Friday, December 14, 2012

Recycled Post: Stress Relief

Only 11 days 'til Christmas, so it must be time for a recycled post.


Shoulder stretches, for really any time of year, come in particularly handy in December.


Saturday, December 1, 2012

Christmas Yoga Advent Calendar

Bonus Weekend Post!

It's always interesting to see what the yoga community comes up with to keep yoga fun for the holidays, and today's addition is no different.

At just one pose a day the Christmas Yoga Advent Calendar by Nicola Jane Hobbs makes yoga totally accessible. Start today to finish in time for Christmas Corpse Pose. If you want more - it could also be done together as a full sequence. You could even add on each day until you're doing the full sequence on Christmas.

Available to Download and/or Print. Free!

Monday, October 8, 2012

Mindful Practice Yoga Sequence

Today's sequence from The Mindful Body takes about 30 minutes -
"The following yoga poses are help to awaken the body and prepare the mind for meditation. Hold each pose for the time shown in parentheses."


For more detailed information, a printable practice, and a video of this sequence visit The Mindful Body

Friday, September 28, 2012

Yoga Sequence for Confidence & Strength

Finish off National Yoga Month with this Lower Body Sequence via Core Integrity with Cat

Practice awareness while strengthening your legs and core. 
I recommend holding each pose for 5 long slow breaths.

Don't forget Savasana!


Wednesday, September 19, 2012

Sequence for Hanumanasana

via FitnessLoveAffair who says:

Yoga for the Splits
Print this out and practice these poses everyday to gain flexibility for the splits. Start by holding each pose for 30 seconds on each side. Work your way up to 1-3 minutes as your muscles start to open up. When you’re ready to try the splits use a block or pillow under your front leg for support until you feel ready to go without.

Wednesday, September 5, 2012

Good Morning Yoga Sequence

What better way to start National Yoga Month than with a delightful 
morning yoga sequence accessible to all levels?


This sequence via Mind Body Green - created by Jennifer Jarrett.

Thursday, June 14, 2012

Baron Baptiste Flow Practice for Meditation

I've been getting really sucked into meditation lately. I'm not doing it as much as I should, but sometimes just out of nowhere I feel myself drawn inward. Guided to my breath by the soft breeze and the sound of birds competing for mates and nesting materials outside.

The primary purpose of asana practice is to prepare the body to comfortably sit in meditation for great lengths of time. Here's a 20 minute flow sequence by Baron Baptiste (founder of Baptiste Power Yoga) to open the hips and spine for happy healthy meditation. Give it a shot!


 Readers via Email - Click Here for the Video

Thursday, May 17, 2012

Know Your Sun Salutation

The Sun Salutation, aka Surya Namaskar, is the seed from which all vinyasa yoga is born. Everyone should know how to do a sun salutation. It's an excellent warm-up for a larger practice; or it can stand alone. Do it once, or do it 108 times, or any number in between. If you're running low on time, or have no idea where to start a home practice - this is all you really need. 


Tuesday, May 15, 2012

Cardio for Hot Yoga Bods

It's about that time of year when the weather is warming up and people are realizing that swimsuits are just around the corner. This of course leads to an increase in cardio for so many people that want to burn off extra body fat.

There are lots of forms of cardio to consider:
  • Jumping Rope
  • Running
  • Jogging
  • Hula Hooping
  • Yoga (yes it can be cardio)
  • Plyometrics
  • and tons of other combinations of fun things that get your heart rate up for a while...
Running is commonly chosen because it's one of the most effective forms of cardio there is. If you're running then you need to do more stretches both before and after your run (because it's also one of the roughest forms of cardio).

Lululemon offers a nice little article on Five pre-run poses for better running. Go Check it Out!


http://www.lululemon.com/community/blog/five-pre-run-poses/

Thursday, April 19, 2012

Moon Salutations with Shiva Rea

Moon Salutations, aka Soma Mandala Namaskar, are like sun salutations except for the moon and therefore they are practiced in a more calm smooth manner. They cultivate quiet feminine energy and are great for evening practices or during stressful times. I do this particular moon salutation pretty regularly (ever since I saw it in an issue of Yoga Journal) and it always makes me feel amazing and blissed out. Try adding this to your evenings to de-stress and soothe the mind and body.


Readers via Email - Click Here for the Video

Monday, April 16, 2012

Get Happy Hips Now

Start this week off right with the happiest hips in your neighborhood. I found this great little sequence via Vega Community that I thought was worth sharing. It was originally posted back in 2010, but I'd bet there are still people with surly back-talking hips that need it. So try out this sequence and see if it doesn't make your week a little more comfortable.

There's also a generously sized pdf version on the original page.


Wednesday, February 15, 2012

You Don't Have To Hate Chaturanga

Most people hate chaturanga because it is hard. Being hard it tends to frustrate people. Then they avoid it as much as possible. Never do it = Never get better at it = Always hate it.

More important than a little ego trouble is the fact that with all the vinyasa people do - a poorly aligned chaturanga dandasana will eventually lead to rotator cuff injuries. These are common among the yoga population and terribly unnecessary. Today I'm going to share with you some easy ways to work on improving your chaturanga so you too can have injury free, strong, defined shoulders and triceps.
(plus some leg and core strength to boot!)
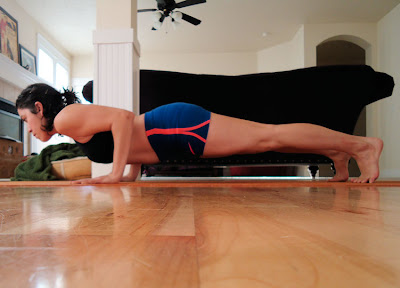
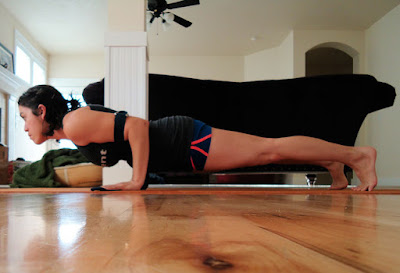
Here's a decent chaturanga dandasana.  Shoulders back, triceps parallel to floor, wrists mostly below elbows, elbows close to side body, low belly lifted, tailbone tucked, reaching back through legs/heels.   

Start from the floor. You can perfect your alignment before you bear any weight so it's safer while you build up the strength to come at it from up high. Then look at your body as 3 separate pieces to break it down.

Lie down on your belly.

Upper Body:
Place your hands on the floor shoulder width apart - wrists below your elbows.
Use your fingers and knuckles. The whole hand should press into the floor.
Ideally elbows are close to your side, but it's more important to keep shoulders back.
If you have to choose - let your elbows splay a bit and keep shoulders back.
Lift your chest/shoulders up so your shoulders are as high as your elbows.
Now your upper body is in chaturanga.
Keep this going.

Lower Body:
Tuck your toes under.
Reach strong through your legs and back through your heels.
Do it harder so your thighs lift from the floor.
Keep it - you're almost there.

Middle Body:
Now activate your lower abdominals - Tuck the lower belly in and up away from the floor.
Lengthen your tailbone towards your heels.
You're in chaturanga!
Hold for a few breaths or do a couple chaturanga pushups to build strength and stamina.

It helps to see it in action, so here's my short silent video!


Beginner's Tip: Use a Strap
Using a strap helps keep the arms aligned and the chest supported. 
If you choose to use the strap - make a loose loop and place both arms through the middle of it. Set up your chaturanga from plank pose. This may be difficult because of the loose strap, but mess with it and figure out how to make it work for you. A partner is helpful to tell you when you've got it.
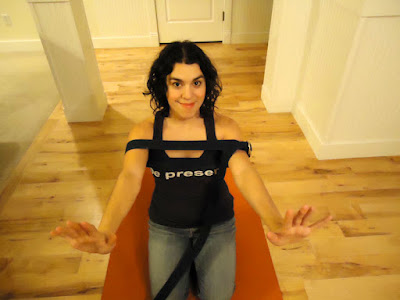
This shirt and strap combo was a poor choice. The strap disappears in the pic, but I was too lazy to take another one. You'll just have to take my word for it - I made a loose loop and strung my arms through the middle of it. It's the excess length hanging down in the middle.  It should be slightly more loose than you think so there's room for it to hang a bit and cradle your chest. Otherwise it just forces your arms forward which defeats the purpose. 
The strap can be higher on your arms, but if you have breasts - you might want it just above your elbows so the strap supports your ribcage more than squashes things.


Questions? Comments? Please do.


In general, this exercise is for anyone, but please don't try any of it without speaking to your Dr. first if you have any medical/physical problems. Seek Peace At Your Own Risk!

Thursday, December 15, 2011

Santa's Christmas Routine - eBook for Kids

Last week I received this little gem in my email and I thought this just needed to be shared. Santa's Christmas Routine is a christmas e-book for kids brought to you by Sanga Yoga  It is written and illustrated by Romi Walker. Such a cute story, and it teaches Santa (and the reader) the sun salutation.

For coordinating christmas card printables - Go Here.

Click Here to Read Santa's Christmas Routine

Friday, September 23, 2011

♥ Anusara Yoga Class with Marie Lumholtz ♥

Each week I've been posting a new video for the 30 day challenge. Since this is the last week of the challenge - this is the last video. I've stepped up the length of class again - it's like 1.5 hours long. It's a full Anusara class with Marie Lumholtz... yay! Because it's Youtube, it may take a while to buffer through the whole thing. So I suggest you let it buffer while you do something else and come back to it later... unless of course you actually have great internet... then disregard this whole chit chat about the buffering.

Finish the 30 days off strong and you will sail right into a daily practice that lasts a lifetime.


These videos are all being added to the original 30 Day Yoga Challenge page, so if you've marked that post then you'll easily have access to all videos.

If you are just hearing about the challenge: You can begin at anytime, so start today!

Readers via Email - Click Here for the Video.

Wednesday, September 21, 2011

Asana Here and Now

For my 30 Day Yoga Challengers I have a little bonus sequence for you to check out. It comes straight out of Ram Dass' book, Remember: Be Here Now. I was surprised to find this little sequence. I'm really just posting it for you to look at. I liked the wavy little line used to direct the order in which to do them. It begins and ends in savasana, so if you're a big fan of this pose, maybe you could try book-ending your sequences like this.

Also - it's a really interesting book. If you're not put off by a lot of talk about LSD. National Yoga Month is a great time to try new sequences or read some classic yogi texts such as this one.


If you haven't joined the 30 Day Yoga Challenge - Start Now!
Then Enter the Giveaway to win some new yoga clothes!

Friday, September 16, 2011

Week 3 Practice Video - 30 Day Yoga Challenge

Today marks the beginning of the 3rd week of the 30 Day Yoga Challenge (for National Yoga Month). If you've been following along then you know I've been digging up a new video each week you can practice with to keep things fresh and interesting. The first couple weeks I featured yoga practices for absolute beginners that were about 20-30 minutes in length. This week I'm bumping it up to an All Levels Vinyasa Flow class with Ally Hamilton that is just shy of One Hour long.

All levels means that it is suitable for beginner, intermediate, or advanced students. There's something for everyone here. However, since it's a flow class it helps to be at least vaguely familiar with some basics. If you've been practicing with the earlier videos posted here you'll be prepared. If this is your first class ever - you'll still be ok. You'll just have to look at the screen more often to know what the heck they're doing all the time.

I really like this sequence and the fact that this video includes a guided savasana instead of dropping you off to do it yourself. Lovely full instruction and a great Ganesha painting made this video my top pick for this week. Enjoy!


These videos are all being added to the original 30 Day Yoga Challenge page, so if you've marked that post then you'll easily have access to all videos.

If you are just hearing about the challenge: You can begin at anytime, so start today!

Readers via Email - Click Here for the Video.

Friday, September 9, 2011

Restorative Sequence with Samantha Mehra

When I started the 30 Day Challenge I posted a great video for beginners to get you started. Since we're starting the 2nd week of the challenge today I thought it was time for a 2nd video. If you've been doing the challenge but aren't used to doing yoga everyday you may be a little sore lately. If that's the case (and even if it's not), then you should totally do the practice in this new video. It's a restorative vinyasa sequence which just means that it's a soft quiet practice that may use props. In this case she does use 2 yoga blocks, but you can use blankets, towels, books, or whatever you have around as a substitute.

This sequence starts out with some pranayama, or breathing exercise, and even if you're weirded out by the whole thing you should give it a try. Nadi Shodhana is great for your energy and your sinuses. That's the breathing exercise she has you do - and it's my favorite one ever. Bonus that she has a great accent. Enjoy!


This video is also being added on to the original 30 Day Yoga Challenge page, so if you've marked that post then you'll easily have access to both videos.

Readers via Email - Click Here for the Video.

Tuesday, August 16, 2011

My Home Practice - What it Looks Like

I've mentioned that I'm really into my yoga, and I do a lot of it... often. I do my morning yoga routine in about an hour just to get me ready for the day. Then later I do my real practice. My full practice. I'm sure you've heard me mention these terms. It's not to say that my morning practice isn't important, but it's not the one where I really dig deep. It's not the one where I stop answering phones and just get into the zone for the afternoon.

The big practice I do each day can take anywhere from 1 - 3 hours. It usually ends up being right around 3 hours because that's just what I'm comfortable doing. I have a lot of things I intend to do and it takes a while to fit them in. Just this morning Adam was saying how I will sometimes sit down intending to stretch for a couple minutes, but then I keep adding one more thing and one more thing until I've accidentally done a full practice and 3 hours have passed. Yes, sometimes it happens that way... but I also have a notebook full of pre-planned sequences I really like to do. Someone asked me last week about my practice - what it looked like, how many asanas I did... soo...

Here's a sequence I wrote - a year or two ago. It's kinda old now. I wrote this sequence purely for Anjaneyasana with mermaid arms. I wanted to nail that pose, so I built a sequence that would get me there. Since then I've added a lot of things and I often ad lib a bunch of stuff as I go that doesn't get written down too. In fact, now this sequence has been altered to get me to Eka Pada Raja Kapotasana 2. This particular sequence takes me 2 - 2.5 hours, so it's pretty standard for me. Not the longest or shortest practice I do... just average.


This isn't for you - don't do this.

As you can see, my personal sequences are kinda involved and full of pictures, abbrevations, names or descriptions that are nowhere near official (it just helps me know what I'm talking about), and little symbols that denote flows or repeated things. Most of these poses I do 2 - 5 times each and the Sun Salutations at the top (looks like SS) I do 2 - 4 of depending on the day.

I'm not suggesting this sequence to anyone - it's all sorts of personalized for me and me alone. This is just an example. A little peek into what it is I do in my personal practice.

Wednesday, August 10, 2011

So Your Forward Bends Suck

Usually when people ask me about forward bends, I tell them to be patient. I tell them to practice their forward bends and to implement the tips they get from their teacher. Not everyone has a teacher that they trust. Therefore, today I'm going to give you a round-about somewhat kind of plan. Do you want to get past the modifications for your forward bends sooner than later? Do you want to effortlessly flop forward into a magnificent toe-touching extravaganza? Then do hip openers. I've written about hip openers before, and I suggest you check it out because that old stuff will come up.

I'm going to suggest a short sweet routine of only 6 poses (in 8 pics) you can do every day. This is not an all inclusive list/sequence - if you know of some hip openers you really like - throw them in. If you're in a hurry you can do these poses in a tiny window of time each morning or evening... maybe during your break at work. Longer holds are better, but doing something is always better than doing nothing. Also - try sitting on the floor more often. Chairs are bad for you.


Wide Legged Forward Bend. Take your legs as wide as is comfortable. Mine is pretty wide - maybe too wide.
Keep your toes flexed and pointing up. Spine LONG, groins open, and tailbone tucked downward. If you're comfortable upright - try folding forward. Keep all those things I just listed and breathe. If your toes start to point more forward than up - you've gone too far. Come out of it a bit until you can keep them up.


Janu Sirsasana. From your wide legged seated stance, bend one knee and bring that heel to the same side thigh/groin crease. Flex your toes - no lazy feet! Turn to face your straight leg. Hold the outside edge of the foot with the opposite hand. Spine long, legs active, fold forward - toward your shin. If you can't reach the foot - hold the leg, grab a strap, or simply place your hands on each side of your straight leg. Carefully return to center and repeat on the other side. PS: my other hand is next to my hip, on fingertips - elbow elevated and shoulder back to keep my side body long.


Cobbler. Soles of your feet together - as close to your groins as is comfortable. Don't worry about it if your knees are far away from the floor. Let the front of your groins open and the tailbone tuck. Flex your feet and keep the soles together. I know some styles teach feet open like a book - I don't. Let gravity push your knees down - don't assist it.  Spine long. If you're comfy upright - try folding forward. 


Cowface Pose - only the lower body part. Sit here with knees approximately stacked best you can. Spine long... don't allow your back to round too much. Be careful with your knees when moving into or out of this pose. Hold for a while then repeat on the other side.


Garland variation. Feet about shoulder distance apart and pointing forward as much as possible. If you can't get your heels to the ground and be comfortable then roll up a mat or stack some blankets under your heels. Press your thighs into your triceps (back of your upper arm) and your triceps into the thighs/knee area. Really pressing your palms together strongly will help. Keep your spine long and breathe.


Pigeon - I love pigeon pose. Obviously. Notice my front knee is inside that same side hand. This type of setup is ideal if you have sensitive knees. Bring your front toes closer to your opposite hip the more your body resists this pose. Eventually your front shin will be parallel to the front of your mat, but start small. Back toes tucked under to assist in pushing that side's hip forward while pulling the bent knee's hip back. This is drawing them towards square.


Keep your front foot flexed. This more forward your foot is - the more important this becomes to protect the knee. Stay up on your fingertips to avoid getting SOGGY in the pose. Spine long, tailbone tucked, shoulders back to support the heart pressing forward.


Fold forward to work a different aspect of the hips. This may make you want to punch someone in the face. You've been warned. Spine long, keep drawing the hips toward square, palms up or down based on preference. Palms down is quieting, Palms up makes the pose (and any bad feelings about it) an offering. Carefully press back to downward facing dog for a few moments before repeating on the other side.

Finish with a 5-10 minute Savasana.
If you try this sequence - let me know if you like it. Let me know if you have questions. I'm always around. Namaste.


In general, this sequence is for anyone, but please don't try this sequence without speaking to your Dr. first if you have any medical/physical problems. Seek Peace At Your Own Risk!


If you're reading this post there's a good chance you want to read these too:
Standing Forward Bends for Unflexible Bodies
Seated Forward Bends for People That Don't Bend That Way
Touch Your Toes - Eventually