Showing posts with label flowers. Show all posts

Wednesday, August 28, 2013

31 Day Nail Art Challenge - Day 14: Flowers

So I've failed yet again at posting on time for this challenge :/ If anyone is waiting with bated breath every Tuesday and Friday...well, I'm sorry I'm always late! haha I actually had this manicure painted and photographed late last night but I had some misgivings about posting them. I decided to sleep on it and after looking back over my photos, I decided to use these as my flower nails!

What were my hesitations, you ask? Well, I was putting a ridiculous amount of pressure on myself for today's mani. I feel like on the whole I am relatively good at doing floral manicures but that has become a bit of a double edged sword! I feel like I've got to outdo myself every time I do florals and I've managed to let it stress me out - sad right!? ;) Please tell me I'm not the only one who is crazy and does this to themselves!? 

I was also a bit hesitant about using this design for my flower look because I don't think they are immediately recognizable as flowers. They are very abstract and more of a sketched and messy look (Meghan and I were totally on the same brain wave with our flowers!) and I thought that maybe I should stick with a more realistic look. In the end, though, I'm really happy with this mani. 

I just got all the cremes from the OPI San Francisco collection and was itching to use them! I started out with a base of Skull and Glossbones and added a top coat (I like doing this because it lets me easily remove errors with acetone). With First Date at the Golden Gate, I painted the red flower petals, followed by In the Cable Car-Pool Lane with the smaller purple petals. The leaves are several messy lines of A-Piers to be Tan and then with a tiny tiny detail brush and black acrylic paint, I did all my outlining. I didn't worry too much about how clean my line-work was or if I painted outside the lines because I wanted the messy, sketched look. 
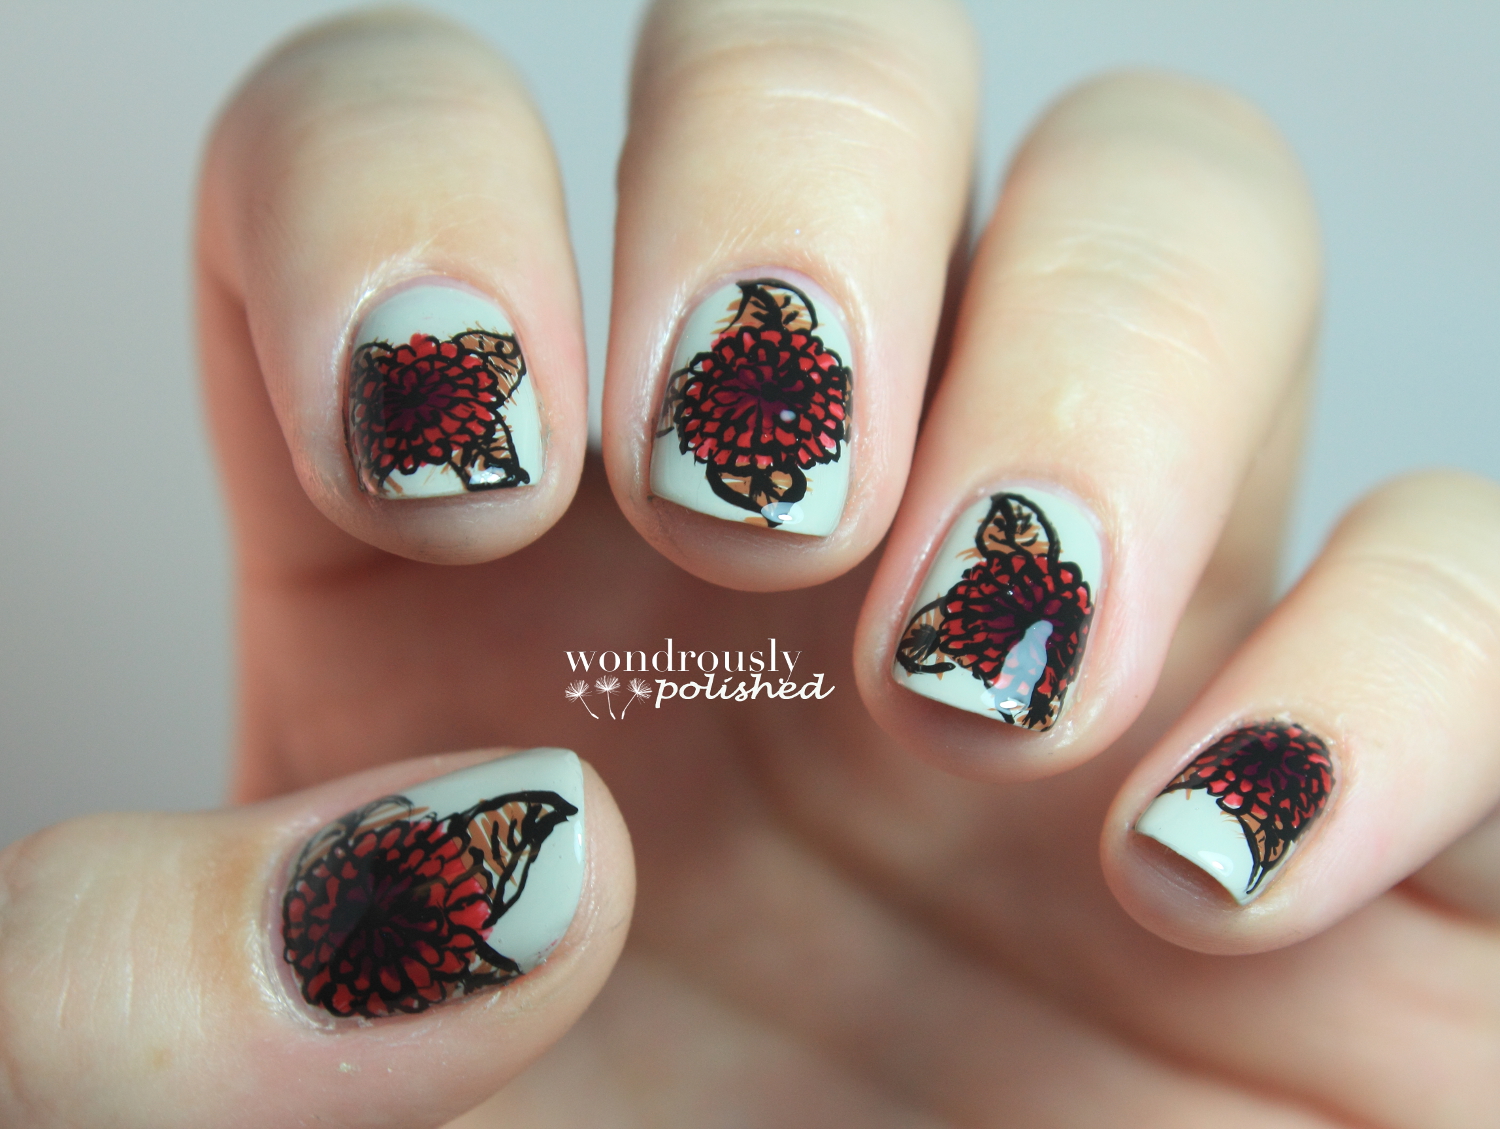
What do you think of these? Do you prefer realistic flowers or more artsy looking flowers? 
Happy Polishing! :)

Friday, August 23, 2013

Skull Pillow

Danijela Tanaskovic created this skull pillow. I'm a big fan of embroidery and love seeing how people use this classic medium to create artwork. The skull is a fantastic example of anatomy and stitches. The addition of the flowers adds a great textural element for this decorative pillow. The design appears simple, but has a strong impact. I'd love to see more of Danijela's work!

Tuesday, August 20, 2013

Flower Skull

Tattooist and painter, Emma Sailor, is our contributing artist today with this lovely flower skull.  Perhaps this is her reminder to all of us of how delicate our skulls really are.  The soft shades of color and textures could resemble the many emotions we endure in our lives that always wind up painted across our faces.  Or, it could just be one colorfully kick ass skull.  It's all about perception.  Thanks for sharing you work with us, Emma!  


Thursday, August 15, 2013

Dia de los Muertos Masks

Amber Allison of Bling Out Your Dead in Los Angeles, CA, creates one of a kind Dia de los Muertos inspired masks. These masks are highly detailed and truly works of art. I love that the 3D elements are incorporated into the mask, vs. just along the top like many Dia de los Muertos masks. With Fall quickly arriving, it's that time of year to start thinking about Halloween and Dia de los Muertos. You can see more of her work on the website, Facebook page, and Etsy shop.


Monday, July 29, 2013

Crocheted Skulls and Flowers

Coco Flowers, from Paris, France, created these crocheted skulls and flowers.


I grabbed this animation from her blog, because the skulls look like they're dancing.


I've been talking about crochet a lot recently, with various crocheters. It's probably because Fall is soon, and I'm pondering new designs...mostly a skull design. Seeing great crocheted skulls like these, really is fantastic inspiration. I love the use of flowers as the eyes. This could help solve a design issue I've been having. Check out Coco Dollz Shop to purchase her creations.

Friday, July 5, 2013

[BONUS] Deer Approved iPhone Skull Case

Marzi Pecen is a friend to deer, a small terry cloth Monkey, and Skull-A-Day. She bought one of Noah's 60. Flower Skull iPhone cases, and let the sweet Snowflake test it out.


This video proves the durability of this case.


For reference, this is what this case looks like...not being handled by a deer.

Monday, June 10, 2013

30 Day Flower Challenge - Allium

Awhile back on my Facebook page I shared a 30 Day Flower Nail Art Challenge that was going on every day through May and I was so so excited to partake in it...because flowers are my favorite! But, life got in the way as well as other challenges and suddenly it was June and I had done absolutely ZERO manicures for the challenge. I was so bummed out because I really loved the idea of this challenge. But the lovely ladies that put on the challenge (datyorLOVES and Delight in Nails) decided to extend the challenge (and accompanying inlinkz codes!) for a whole year. 
So, I decided to quite slacking and go for it! I'm going to try and complete the challenge but who knows how long it will take me. 

The first day's flower is the Allium. Me and my inept gardening skills had no idea what this flower was so I of course turned to google.
Alliums are really quite pretty and it provided the opportunity to use too many of my purples together. 
The actual flower seems to be made up of tiny almost star like flowers that create the round shape that you see. Since I don't have the patience or talent to create that many tiny star petals, I just did a bunch of tiny dots all on top of each other in a circle to create the shape and color. I think they look close enough ;) 
Hopefully I can stick with this challenge. I really love the idea of it and I think it will provide great inspiration. 

Be sure to check out the other two ladies that took part in the Challenge in May. 

Happy Polishing! :)

Tuesday, June 4, 2013

Funky Floral

Yeee! Can I just say that I am so super duper uber excited about this mani!? I'm sure that by now you all know of my passion/love/obsession with floral looks (and hopefully you're not getting tired of them!) and this manicure is just making me so happy to look at! Prepare for photos!!

This didn't actually start out as well as I had originally hoped. I had done almost 4 nails of another floral look but was really hating it. Sometimes I will push through with a design and hope that once I'm finished and have added a top coat that I'll finally like it. But that didn't happen with my original look.  At all. So, I scratched what I was doing and plunged my painted fingers into my super awkward acetone tub from Target (I mean, it's pink and has weird bristles and is just...weird...but works wonders!) and started fresh. And I'm so happy that I did! 

I ended up with these super funky flowers and am just so freaking happy with out they turned out. I absolutely love when I create something that I just want to stare at for hours. It doesn't always happen and I'm so proud of myself when I'm able to create something I really truly love. I hope you love them like I do! 
 I used a TON of colors for this look. The base is OPI's My Vampire is Buff, which is frankly, my favorite base polish for nail art. It's just subtle enough, but still has enough depth and warmth that it really works well with so many different pallets. 
 As for the other colors, there are so many! Please let me know if you are curious about any color in particular.  
I used a few different brushes for these  - a tiny detail brush, a long and thin striper brush, and a medium sized striping brush. The thin striper is what I used to create the purple outline around everything, and while it is definitely a finicky brush to use, it really give nice thin lines. 
What do you think of this look? Am I crazy for being so in love with them?? Also, would you be interested in a tutorial of any of the flowers? I don't think I could do all of them, but I would definitely be up for the crowd favorite :)

Happy Polishing! :)

Sunday, May 19, 2013

A green thumb equivalent

We all have those things that we are really great at and other things that we just completely fail to grasp the basics of. I know this can be said about me. For instance, I completely fail when it comes to  making a good meal, keeping plants alive, or not being awkward. On the flip side, I'm REALLY good at making terrible meals, killing plants, and being incredibly awkward! See, you've got to find what you're good at and really stick to it! ;) 

All joking aside, I did not get my mother's cooking or gardening gene (I want it though!). Despite my lack of green thumb in the garden, I have been trying to make up for that by painting flowers on my nails instead - at least their killing only involves acetone and cotton balls instead of any neglect on my part ;) 

So for today I've got another flower manicure to share with you all! I didn't intend these to be any flower in particular, but please let me know if you think otherwise. 
I used Julep's Millie for my base color and created the flowers with Julep's Drew (pink) and Zoya's Natalie (orange). I used my thin detail brush and Julep's Sally to add the detail around the petals, and the center of the flower is Julep's Robin. Definitely a Julep heavy manicure, but I really love how this turned out. 
What do you think of my substitute for real flowers? 

Happy Polishing :)

Sunday, May 12, 2013

Mother's Day Carnations

Happy Mother's Day to all you wonderful Moms out there! I'm a dog Mama, but I don't know how much that really counts ;) 

I know so many people say this about their own mothers, but really, I have the best Mom in the entire world. She is without a doubt my best friend, my biggest cheerleader, and my rock. She is beautiful and strong,and intelligent  and funny as hell to boot. Seriously proud to call her my mom and I hope that one day I can be half the woman she is. She's fabulous. 

But I digress ;) I wasn't sure which way I wanted to take this mani so I started researching Mother's Day in general. Apparently, in the U.S. it was originally started after the Civil War in an effort to reconnect families that had been divided during the war. One of the main proponents of making Mother's Day a national holiday was Anna Jarvis. Her mother helped establish a "Mother's Friendship Day," but died in 1905 before the celebration became popular. Anna chose the carnation as the flower of Mother's Day because they were her mother's favorite. Later, it became established that white carnations were for mothers who had passed away and red for those still living. 

Look how much we learned! Haha maybe the whole living and dead aspect is a bit morbid, but I decided to roll with the carnation theme and since I am fortunate enough to have my lovely mother around still, I decided to paint red carnations. 
 After I painted these I got a very strong urge to mattify them...so I did!
Which version do you like better? Matte or shiny?

Happy Polishing and Happy Mother's Day <3

Monday, May 6, 2013

Return of the Curls... Curls Gone Wild Favorite Pics!

This lovely burgundy dress, hair and paint combo was my favorite of the day ;)


And Sisterly Grace was the dance performance group I painted. They totally rocked it :)

Wednesday, May 1, 2013

May Nail Art Challenge - Flowers

Hello lovelies! I have a super super quick post for you tonight.

I think I said something similar at the start of last month, but holy cow! Can you believe that it's already May! Happy May Day to you all :) I'm doing another monthly nail art challenge for this month and the first theme is flowers again! I love me some flowers. I put these together in about 20 minutes so that's why there isn't too much going on with them. I think I like them? I keep going back and forth on them! 

I used Zoya's Neely (ZOMG AMAZING) as the base color, and the flowers are made up of SOPI's Leotard Optional, and Lime Crime's Milky Ways and Lavendary. What do you think?
Happy Polishing :)

Friday, April 19, 2013

Spanish (Majolica) Inspired Flower Tutorial

Happy early morning! I really should be in bed but instead I decided to fix the chip in my most recent mani...and I thought it would be a perfect opportunity to make a pictorial to share with you all! 

I recently found out that the style of art I was inspired by is actually called Majolica. I love this style so much so I'm glad to know what it's actually called ;) 

Anyway, on to the pictorial! For this mani, you'll need a detail brush and a small dotting tool or toothpick, as well as several different polishes. I think you could easily do this with 2 colors, alternating for each step, but I like the bright colors all together. 
1. Paint your base color and let it dry completely. I always use a top coat between my base color and my nail art, but this is personal preference.
2. With your detail brush, paint a plus sign in the middle of your nail. 
3. Create another plus sign, but rotated at 45°. This should create 8 different "petals."
4. Using your detail brush, fill out each petal using the lines from steps 2 & 3 as your template. Try to create 8 tiny ovals. 
5. Repeat steps 2 & 3 on a smaller scale with a new color. 
6.  Create the first inner petals by making tiny triangles, again using the line work from step 5 as your template. 
7. Using your dotting tool and a new color, create the inner flower with either a simple dot or 8 tiny dots in each triangle (as I have shown). 
8. Repeat Step 7 with your final polish color. 
9. I added some darker orange and red to the outer petals to add some dimension and then added some top coat after waiting a bit for your polish to dry. 

I used a total of 7 polishes for this one, my smallest dotting tool, and my new detail brush :)
I always struggle with figuring out how to explain each of the steps I take. It's a lot harder than it seems and I never feel like I do a very good job of it. I was getting frustrated with it tonight so I brought my boyfriend over to tell me how he would explain each of the steps based only on looking at the photo. Here is his very simplified version of this pictorial as he said them to me: 

1. White coat
2. Add cross
3. Uh...rotate the crosses 
4. Parabolas 
5. Little baby crosses (red)
6. Make em' triangles
7. Easy...spinach!
8. Blue spot
9. Top coat 

I guess I'll keep him around ;)

Let me know if you have questions and happy polishing!!